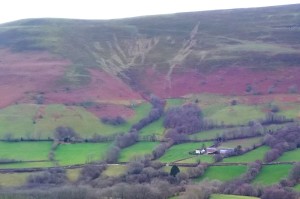
 A few weeks ago my wife and I had a couple of nights in an Airbnb in the Black Mountains hills, part of the Brecon Beacons National Park in Wales. Part of the reason for choosing that particular location was that there were a few walks directly from the door with no driving involved. ( It was on a working farm with rare breed sheep and deer, the white building on the bottom right of the photo )
The weather wasn’t really conducive for walking but I managed one outing up a local hill called Waun Fach and, as usual, recorded the route on my GPS. I wanted to create a 3D model of the route but using some sort of contour line annotation rather than the Google satellite image that I’ve used previously. As always the process was not as straightforward as I’d initially imagined but I did eventually end up with something interesting:
The process is described in more detail below but a few notes:
- The red line is the GPS track. I’ve tidied it up slightly because there were a few gaps and I’m only showing half the route because it was an out & back on the same path.
- The terrain elevation data comes from the freely accessible LiDAR data.
- There are no pictures from my heroic summit push because the lead elements of Storm Eunice moved in and the low cloud and the horizontal driving rain were not an encouragement to hang about taking photos 🙂
If you’re not interested in my adventures in cartography then scroll to the bottom where there are a few pictures and some history notes!
Overlay Plan A
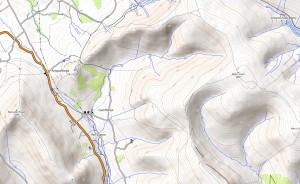 My initial thought was to get the contour line data from the OpenTopoMap site ( example right ). This is based on Open Street Map and uses the same web API for fetching the data. The SAGA GIS tool that I’ve used previously will fetch the Open Street Map data and only required a small tweak to fetch the Open Topo data instead. However ( you knew that was coming 🙂 ) there were three problems:
Note that these problems were largely diagnosed using the using the tcpdump tool which is invaluable for this sort of debugging.
Firstly the SAGA GIS download uses http rather than https. This isn’t a problem with OpenStreetMap as the same data appears to be downloaded whichever protocol is used. With the OpenTopoMap data however any fetches using http return a 301 Moved Permanently response which, although correct, is not parsed correctly by SAGA GIS and the download fails. ( See also this note ). This I got round by temporarily adding a rule to iptables to redirect the outgoing http fetches to https.
Secondly, although the OpenStreetMap data is downloaded quickly, the OpenTopoMap equivalent didn’t seem to work. I thought that there was some problem with the API but by watching what data was being fetched I realised that it was working, just extremely slowly. I suspected that there was some throttling going on and by experimenting with the wget tool and changing the User Agent strings it seems that downloads from a web browser have a quick response something like SAGA GIS had a much slower response. However the OpenTopoMap data did finally download, taking about 20 minutes rather than the usual sub one minute for OpenStreetMap.
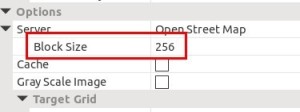 Finally I’ve always thought that the standard OpenStreetMap overlay images were at slightly too low a resolution and I decided that I needed to increase the zoom level that SAGA GIS was using for the download. Naturally the documentation is non-existent but I eventually found that by changing the “Block Size” in the “Import TMS Image” dialog from 256 to 128 I could change the zoom level from 16 to 17. However my jubilation was short lived as the OpenStreetMap download now started to throttle as well and it also seemed to be downloading a lot more data than I expected and I eventually lost patience that it would ever complete 😦
Note that I’m not 100% sure that my analysis is correct on these three points but I can’t immediately see any glaring holes. Anyway, for my sanity, it was now time to abandon this method and move on …
Overlay Plan B
Similar contour line and map data is available from the Ordnance Survey website under a very liberal licence with just an attribution needed. I downloaded the relevant files from the following data sets:
- OS Open Zoomstack – A comprehensive basemap of Great Britain showing coverage from national level right down to street detail.
- OS Terrain® 50 – Visualise simple landscapes in 3D and bring your geographic analysis to life.
Unfortunately when I imported these into SAGA GIS it insisted on treating the GeoTIFF formatted basemap files as digital elevation data rather than as an images. If I forced it to import as an image then it seemed to lose the geographic coordinates. There’s a similar problem report here but I didn’t manage to get the suggested solution to work.
As a last, desperate, final attempt to make this work I switched tools and opened my copy of QGIS. This is another open source GIS tool with a lot more users and online documentation than SAGA GIS. However it’s swings and roundabouts as SAGA GIS has a much better gap filling algorithm which I’ve found essential for dealing with the LiDAR files as they seem to have a fair amount of missing data. Anyway all the data imported without a hitch into QGIS and I was able to clip it to fit the LiDAR data by using a GeoTIFF image exported from SAGA GIS. It literally took 20 minutes, 15 of which was taken in figuring out how to import and rearrange the Ordnance Survey data in the correct order. 😦
After that it was just a case of exporting an overlay image of the correct resolution and creating the model. I had to crop it quite extensively to fit in the 50 Mbyte upload limit of my Sketchfab plan but it eventually worked OK. The resulting model is not bad but I’d like some more detail of the terrain. I think that this should be possible with a different OS data set but which will probably require an OS login ( which I have ) but they don’t make it easy to find the various products so that will have to wait for another day.
Welsh Marches
The eastern end of the Brecon Beacons is part of what is known as the Welsh Marches. The boundary between Wales and England has a long and complex history and the Marcher Lordships concept started in Norman times. ( I see it essentially as an early outsourcing arrangement where the King of England employed the Marcher Lords to keep the Welsh out 🙂 ).
Naturally the area is chock full of castles and fortified manor houses, one of the finest being Tretower Court and Castle.

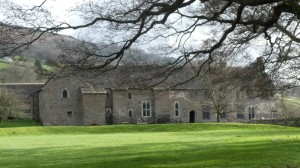
It was originally a 12th Century Norman castle which then morphed into a medieval fortified manor house in the 14th Century. The interior of the house has been restored to what is would have looked like in the mid 15th Century complete with medieval paint if you know where to look!
If castles are not your thing then we can also recommend Hay-on-Wye which styles itself as “the World’s largest Secondhand and antiquarian book centre”. I have no proof of this claim but I can confirm that it’s possible to spend an awfully long time browsing all the different bookshops on offer and to make a surprisingly large dent in your wallet at the same time. 🙂


